今回はオブジェクトをワイヤーフレームで表示する。
表示する物体は、MSDN のサンプル「3-D ソリッドのサンプル」に含まれる円錐を使う。
http://msdn.microsoft.com/ja-jp/library/ms771784%28v=vs.90%29.aspx
サンプルの「cone3d.cs」と「primitive3d.cs」をプログラムに取り込んで使った。
ちなみに、今回はテクスチャは使わないので関係ないが、球体と同じく、やはりそのまま使うとテクスチャ画像が左右反転されてしまう問題があるようだ。修正するには Cone3D クラスの GetTextureCoordinate メソッドを以下のように少し書き換える。
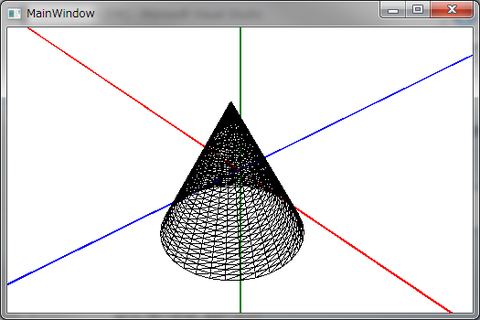
ワイヤーフレームは、座標系を描くのにも使っている ScreenSpaceLines3D クラスが MakeWireframe メソッドを持っているので、これを使う。ただし、単にワイヤーフレームで表示するという意味ではなく、ワイヤーフレームのオブジェクトを作るということになるが。
MainWindow.xaml.cs は以下のとおり。
実行結果は以下のとおり。
以上。
表示する物体は、MSDN のサンプル「3-D ソリッドのサンプル」に含まれる円錐を使う。
http://msdn.microsoft.com/ja-jp/library/ms771784%28v=vs.90%29.aspx
サンプルの「cone3d.cs」と「primitive3d.cs」をプログラムに取り込んで使った。
ちなみに、今回はテクスチャは使わないので関係ないが、球体と同じく、やはりそのまま使うとテクスチャ画像が左右反転されてしまう問題があるようだ。修正するには Cone3D クラスの GetTextureCoordinate メソッドを以下のように少し書き換える。
        private Point GetTextureCoordinate(double t, double y)
        {
            Matrix m = new Matrix();
            m.Scale(1 / (2 * Math.PI), -0.5);

            //Point p = new Point(t, y);
            Point p = new Point(1 - t, y);
            p = p * m;

            return p;
        }
ワイヤーフレームは、座標系を描くのにも使っている ScreenSpaceLines3D クラスが MakeWireframe メソッドを持っているので、これを使う。ただし、単にワイヤーフレームで表示するという意味ではなく、ワイヤーフレームのオブジェクトを作るということになるが。
MainWindow.xaml.cs は以下のとおり。
using System;
using System.Collections.Generic;
using System.Linq;
using System.Text;
using System.Threading.Tasks;
using System.Windows;
using System.Windows.Controls;
using System.Windows.Data;
using System.Windows.Documents;
using System.Windows.Input;
using System.Windows.Media;
using System.Windows.Media.Imaging;
using System.Windows.Media.Media3D;
using System.Windows.Navigation;
using System.Windows.Shapes;

namespace sample1
{
    /// <summary>
    /// MainWindow.xaml の相互作用ロジック
    /// </summary>
    public partial class MainWindow : Window
    {
        public MainWindow()
        {
            InitializeComponent();
            Init();
        }

        private void Init()
        {
            var root = this.Content as Grid;

            // trackball
            var td = new _3DTools.TrackballDecorator();
            root.Children.Add(td);

            // viewport
            var viewport = new Viewport3D();
            td.Content = viewport;

            // camera
            var camera = new PerspectiveCamera();
            camera.Position = new Point3D(14, 13, 12);
            camera.LookDirection = new Vector3D(-14, -13, -12);
            camera.UpDirection = new Vector3D(0, 1, 0);
            viewport.Camera = camera;

            // light
            var light = new DirectionalLight();
            light.Color = Colors.White;
            light.Direction = new Vector3D(-2, -3, -1);
            var lightModel = new ModelVisual3D();
            lightModel.Content = light;
            viewport.Children.Add(lightModel);

            var light2 = new AmbientLight();
            light2.Color = Color.FromRgb(128, 128, 128);
            var lightModel2 = new ModelVisual3D();
            lightModel2.Content = light2;
            viewport.Children.Add(lightModel2);

            // axis
            var xAxis = new _3DTools.ScreenSpaceLines3D();
            xAxis.Points.Add(new Point3D(-100, 0, 0));
            xAxis.Points.Add(new Point3D(100, 0, 0));
            xAxis.Color = Colors.Red;
            xAxis.Thickness = 1;
            var yAxis = new _3DTools.ScreenSpaceLines3D();
            yAxis.Points.Add(new Point3D(0, -100, 0));
            yAxis.Points.Add(new Point3D(0, 100, 0));
            yAxis.Color = Colors.Green;
            yAxis.Thickness = 1;
            var zAxis = new _3DTools.ScreenSpaceLines3D();
            zAxis.Points.Add(new Point3D(0, 0, -100));
            zAxis.Points.Add(new Point3D(0, 0, 100));
            zAxis.Color = Colors.Blue;
            zAxis.Thickness = 1;
            var axis = new ModelVisual3D();
            axis.Children.Add(xAxis);
            axis.Children.Add(yAxis);
            axis.Children.Add(zAxis);
            viewport.Children.Add(axis);

            // cone
            var cone = new Cone3D();
            var coneWireframe = new _3DTools.ScreenSpaceLines3D();
            coneWireframe.MakeWireframe(cone.Content);
            coneWireframe.Color = Colors.Black;
            var trans = new Transform3DGroup();
            trans.Children.Add(new ScaleTransform3D(2.5, 2.5, 2.5));
            trans.Children.Add(new TranslateTransform3D(2.5, 2.5, 2.5));
            coneWireframe.Transform = trans;

            viewport.Children.Add(coneWireframe);
        }
    }
}
実行結果は以下のとおり。

以上。
