今回は Dapper を使って INSERT、UPDATE、DELETE をしてみる。
フォームにボタンを3つ追加し、button2でINSERT、button3でUPDATE、button4でDELETE の処理を行う。簡単にするため、これらのボタン処理では DB を更新するだけなので、表示に反映させるためには button1 で SELECT しなおす必要がある。
なお、何度か button1 を押すことになるので、グリッドのカラムを設定する処理はコンストラクタに移動させた。
Dapper では、SQL で INSERT、UPDATE、DELETE 文を作り、Execute メソッドで実行することになる。パラメタライズドクエリーなだけで、本当に生のSQLを書く必要があるようだ。
ただし、Dapper には DapperExtention や Rainbow などの拡張が用意されており、それらを使うと Insert メソッド、Update メソッド、Delete メソッドが使えるようだ。それで少しは便利になるが、Dapper の導入は1ファイルを追加するだけという売りがなくなってしまうのであるが。。。
実行結果は以下のとおり。まず button1 で表示。
button2 で追加後、button1 で再表示。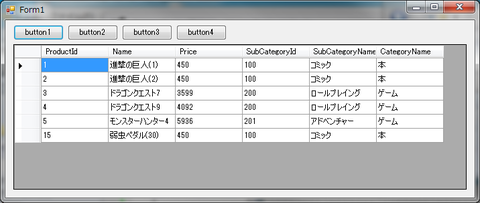
button3 で更新後、button1 で再表示。
button4 で削除後、button1 で再表示。
以上。
フォームにボタンを3つ追加し、button2でINSERT、button3でUPDATE、button4でDELETE の処理を行う。簡単にするため、これらのボタン処理では DB を更新するだけなので、表示に反映させるためには button1 で SELECT しなおす必要がある。
なお、何度か button1 を押すことになるので、グリッドのカラムを設定する処理はコンストラクタに移動させた。
using System;
using System.Collections.Generic;
using System.ComponentModel;
using System.Data;
using System.Data.SqlClient;
using System.Drawing;
using System.Linq;
using System.Text;
using System.Threading.Tasks;
using System.Windows.Forms;
using Dapper;

namespace DapperTest1
{
    public partial class Form1 : Form
    {
        private string connectionString = "Data Source=(local);Database=ORMTest;User ID=ORMTest_user;Password=ORMTest_password";

        public Form1()
        {
            InitializeComponent();

            dataGridView1.AutoGenerateColumns = false;
            dataGridView1.Columns.AddRange(
                new DataGridViewTextBoxColumn()
                {
                    DataPropertyName = "ProductId",
                    Name = "ProductId",
                },
                new DataGridViewTextBoxColumn()
                {
                    DataPropertyName = "Name",
                    Name = "Name",
                },
                new DataGridViewTextBoxColumn()
                {
                    DataPropertyName = "Price",
                    Name = "Price",
                },
                new DataGridViewTextBoxColumn()
                {
                    DataPropertyName = "SubCategoryId",
                    Name = "SubCategoryId",
                },
                new DataGridViewTextBoxColumn()
                {
                    DataPropertyName = "SubCategoryName",
                    Name = "SubCategoryName",
                },
                new DataGridViewTextBoxColumn()
                {
                    DataPropertyName = "CategoryName",
                    Name = "CategoryName",
                }
            );
        }

        private void button1_Click(object sender, EventArgs e)
        {
            IEnumerable<Product> resultList = null;

            using (var conn = new SqlConnection(connectionString))
            {
                conn.Open();
                resultList = conn.Query<Product, SubCategory, Category, Product>(
                    @"SELECT p.*, s.*, c.* FROM Product p
                    INNER JOIN SubCategory s ON s.SubCategoryId = p.SubCategoryId
                    INNER JOIN Category c ON c.CategoryId = s.CategoryId",
                    (p, s, c) => { p.SubCategory = s; s.Category = c; return p; },
                    splitOn: "SubCategoryId, CategoryId"
                ).ToList();
                conn.Close();
            }

            dataGridView1.DataSource = resultList;
        }

        private void button2_Click(object sender, EventArgs e)
        {
            using (var conn = new SqlConnection(connectionString))
            {
                conn.Open();
                int count = conn.Execute(
                    @"INSERT Product (Name, Price, SubCategoryId)
                    VALUES (@Name, @Price, @SubCategoryId)",
                    new { Name = "弱虫ペダル(30)", Price = 450, SubCategoryId = 100 });
                conn.Close();
            }
        }

        private void button3_Click(object sender, EventArgs e)
        {
            using (var conn = new SqlConnection(connectionString))
            {
                conn.Open();
                int count = conn.Execute(
                    @"UPDATE Product SET
                    Name = @Name, Price = @Price, SubCategoryId = @SubCategoryId
                    WHERE ProductId >= @ProductId",
                    new { Name = "ポケットモンスター X", Price = 3918, SubCategoryId = 200, ProductId = 6 });
                conn.Close();
            }
        }

        private void button4_Click(object sender, EventArgs e)
        {
            using (var conn = new SqlConnection(connectionString))
            {
                conn.Open();
                int count = conn.Execute(
                    @"DELETE FROM Product
                    WHERE ProductId >= @ProductId",
                    new { ProductId = 6 });
                conn.Close();
            }
        }
    }

    public class Product
    {
        public int ProductId { get; set; }
        public string Name { get; set; }
        public int Price { get; set; }
        public int SubCategoryId { get; set; }

        public SubCategory SubCategory { get; set; }
        public string SubCategoryName { get { return SubCategory.Name; } }
        public string CategoryName { get { return SubCategory.Category.Name; } }
    }

    public class SubCategory
    {
        public int SubCategoryId { get; set; }
        public string Name { get; set; }
        public int CategoryId { get; set; }

        public Category Category { get; set; }
    }

    public class Category
    {
        public int CategoryId { get; set; }
        public string Name { get; set; }
    }
}
Dapper では、SQL で INSERT、UPDATE、DELETE 文を作り、Execute メソッドで実行することになる。パラメタライズドクエリーなだけで、本当に生のSQLを書く必要があるようだ。
ただし、Dapper には DapperExtention や Rainbow などの拡張が用意されており、それらを使うと Insert メソッド、Update メソッド、Delete メソッドが使えるようだ。それで少しは便利になるが、Dapper の導入は1ファイルを追加するだけという売りがなくなってしまうのであるが。。。
実行結果は以下のとおり。まず button1 で表示。

button2 で追加後、button1 で再表示。

button3 で更新後、button1 で再表示。

button4 で削除後、button1 で再表示。

以上。
